
Step-by-step Astro and Tailwind setup: install packages, enable the Vite plugin, import Tailwind, and style components quickly.
Before you start: npm and the VS Code terminal
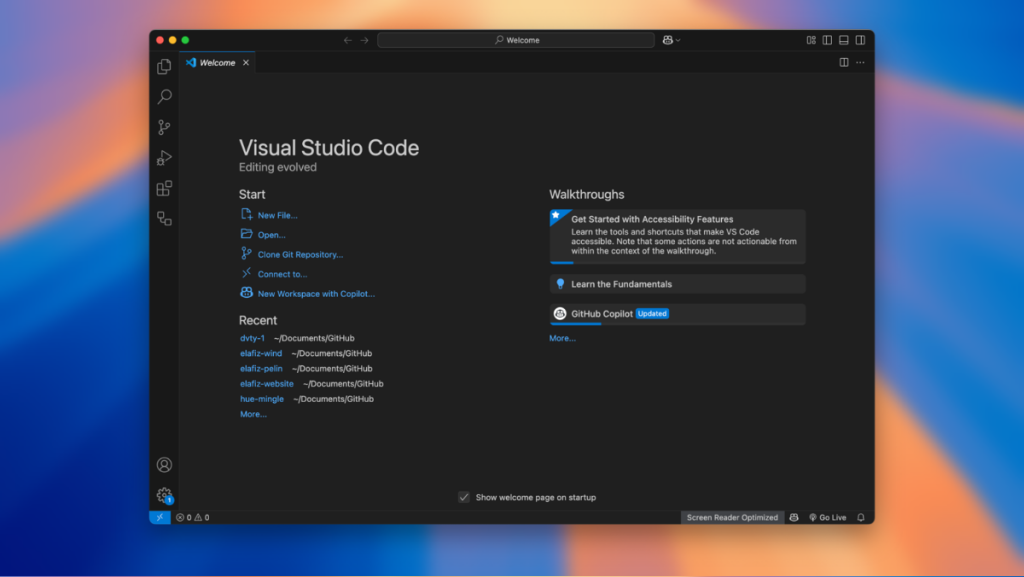
What are Node and npm?
Node.js lets you run JavaScript outside the browser. npm is Node’s package manager and ships with Node installers, used to install and run tools like Astro and Tailwind.
Install or verify Node + npm
Use the current LTS from nodejs.org or a version manager like nvm. Check versions in any terminal: node -v and npm -v.
Open the terminal in VS Code
Use Terminal → New Terminal or press Ctrl+**. Create another shell with **Ctrl+Shift+. You can also pick a default shell via Terminal: Select Default Profile.
Astro’s Node requirement
Astro supports Node v18.20.8 or v20.3.0, and v22.0.0+. If you’re on v19 or v21, switch before continuing.
1) Create a new Astro project
Run the CLI wizard and follow the prompts.
npm create astro@latest
cd <your-project>
npm install
npm run dev
Astro’s installer scaffolds a project with sensible defaults and a dev server.
Tip: the Astro docs also show a full manual install path if you prefer to set up
package.json,astro.config.mjs, and scripts yourself.
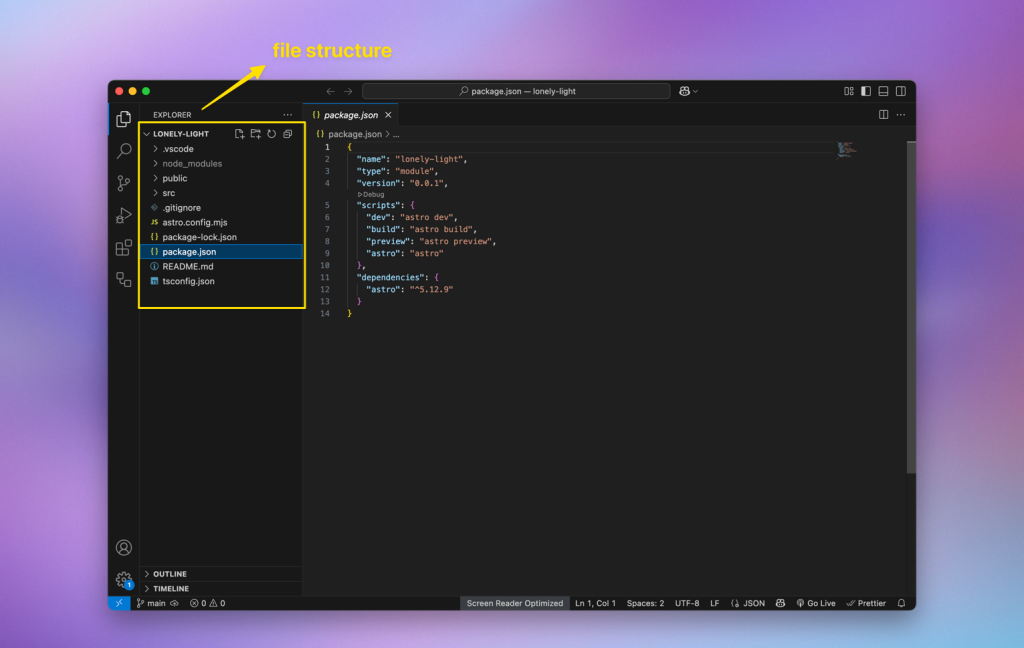 Our project after Astro installation
2) Add Tailwind v4 using the official Vite plugin
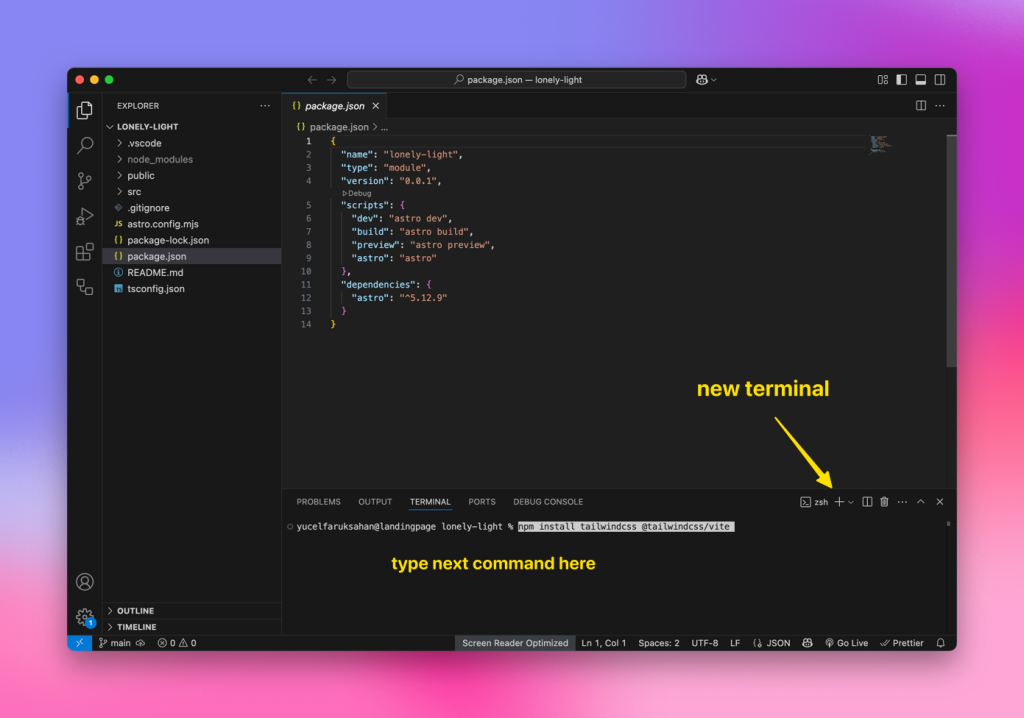
Install Tailwind and the plugin:
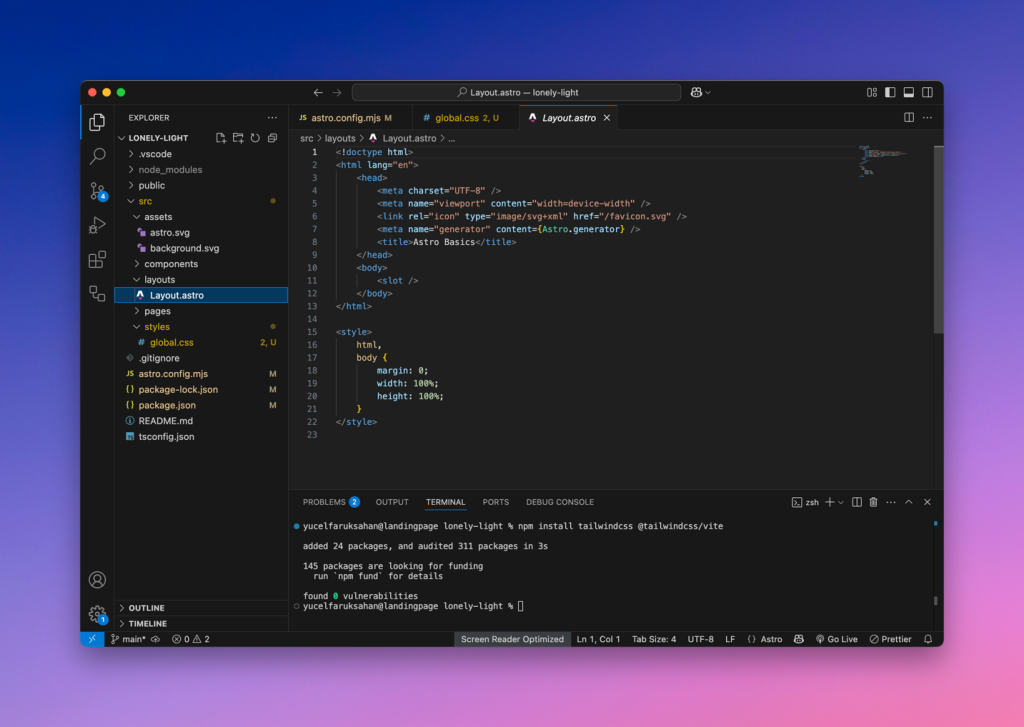
npm install tailwindcss @tailwindcss/vite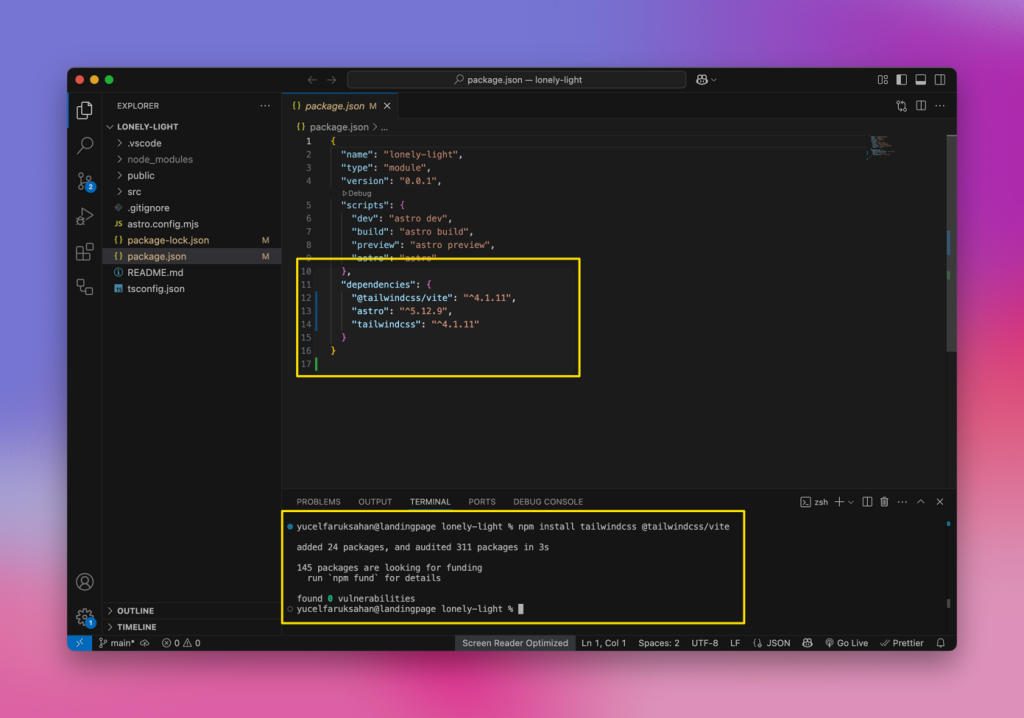 Our project after Tailwind installation
Enable Tailwind via the Vite plugin in astro.config.mjs
Keep your default export and add the plugin under vite.plugins:
// astro.config.mjs
// @ts-check
import { defineConfig } from "astro/config";
import tailwindcss from "@tailwindcss/vite";

export default defineConfig({
  vite: {
    plugins: [tailwindcss()],
  },
});
This wires Tailwind v4 into Astro using the official @tailwindcss/vite plugin, which both Tailwind and Astro recommend.
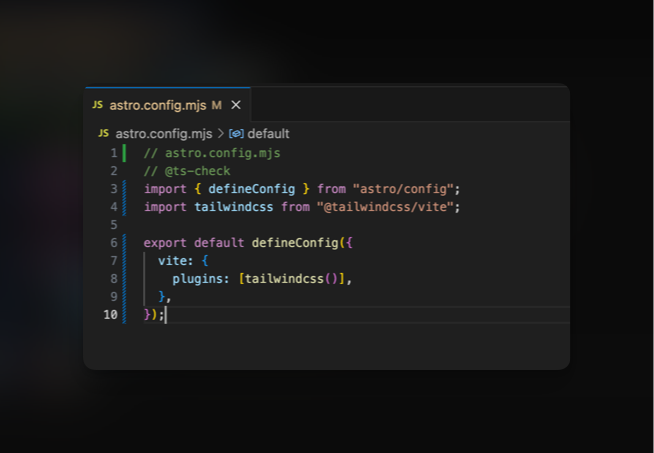
astro.config.mjs should look like this
If you see older guides using
@astrojs/tailwind, skip them. That integration is deprecated for Tailwind 4. Use the Vite plugin instead.
Notes
Using TypeScript config? The setup is the same in
astro.config.ts.After changing your config, restart the dev server so the plugin loads.
3) Import Tailwind in a global stylesheet
Create src/styles/global.css:
/* src/styles/global.css */
@import "tailwindcss";

/* Optional: define design tokens with @theme */
@theme {
  --color-brand-500: oklch(0.72 0.12 260);
  --breakpoint-3xl: 120rem; /* adds 3xl: variant */
}

/* Optional: enable the Typography plugin */
@plugin "@tailwindcss/typography";
or install @tailwindcss/typography plugin seperately.
npm i -D @tailwindcss/typographyIf you see ‘Can’t resolve @tailwindcss/typography’, either install the package or remove the
@pluginline. Tailwind v4 reads plugins from CSS, so leaving the directive requires the npm package.
Then import it once in a layout or page:
---
// src/layouts/BaseLayout.astro
import "../styles/global.css";
const { title = "Astro + Tailwind v4" } = Astro.props;
---
<html lang="en">
  <head>
    <meta charset="utf-8" />
    <title>{title}</title>
  </head>
  <body class="min-h-screen bg-white text-slate-800">
    <slot />
  </body>
</html>
Astro layouts are reusable page shells with a <slot />; importing global.css here is the recommended way to load Tailwind across pages.
Then, wrap any page with your layout:
---
// src/pages/index.astro
import Layout from "../layouts/Layout.astro"; // or BaseLayout.astro
---
<Layout title="Home">
  <h1 class="text-3xl font-bold">Hello world 👋</h1>
</Layout>
Before
After
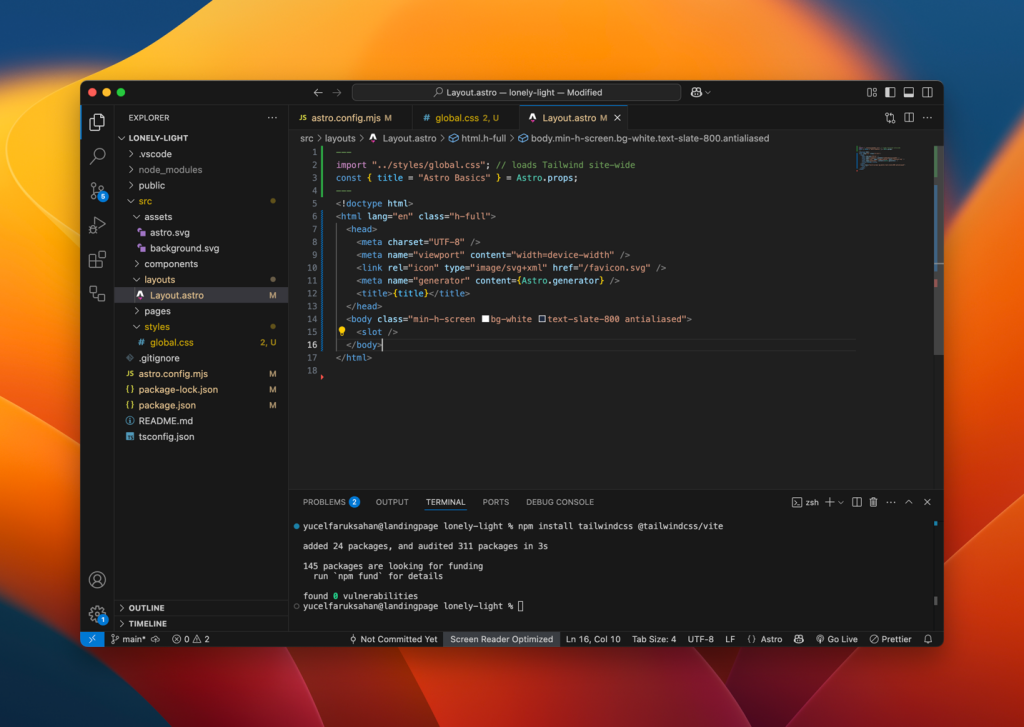
Layout.astro can also be called as BaseLayout.astro which is just a common convention in the Astro docs. What matters is that you import your global.css (the one that contains @import "tailwindcss") into that layout so Tailwind loads on every page.
Use the layout on your pages
---
// src/pages/index.astro
import Layout from "../layouts/Layout.astro"; // or BaseLayout if you rename
---
<Layout title="Home">
  <h1 class="text-3xl font-bold tracking-tight">Hello Tailwind + Astro</h1>
  <p class="mt-2 text-slate-600">Styled via global.css and the layout.</p>
</Layout>
Tailwind v4 is CSS-first: define tokens with @theme, add plugins via @plugin, and import Tailwind with @import "tailwindcss".
4) Build your first page
Astro turns every file in src/pages/ into a route automatically. Create (or edit) src/pages/index.astro, wrap it with your existing layout, and use Tailwind classes right away:
---
// src/pages/index.astro
import Layout from "../layouts/Layout.astro";
---
<Layout title="Home">
<section class="mx-auto max-w-3xl p-6">
<h1 class="text-3xl font-bold tracking-tight">Hello Tailwind + Astro 👋</h1>
<p class="mt-2 text-slate-600">
You’re seeing Tailwind styles because <code>global.css</code> is imported in <code>Layout.astro</code>.
</p>
<div class="mt-6 grid grid-cols-1 gap-4 md:grid-cols-2">
<div class="rounded-xl border p-4">
<h2 class="text-lg font-semibold">Card A</h2>
<p class="text-sm text-slate-500">Responsive via <code>md:</code> utilities</p>
</div>
<div class="rounded-xl border p-4 bg-slate-50">
<h2 class="text-lg font-semibold">Card B</h2>
<p class="text-sm text-slate-500">Styled with Tailwind utility classes</p>
</div>
</div>
</section>
</Layout>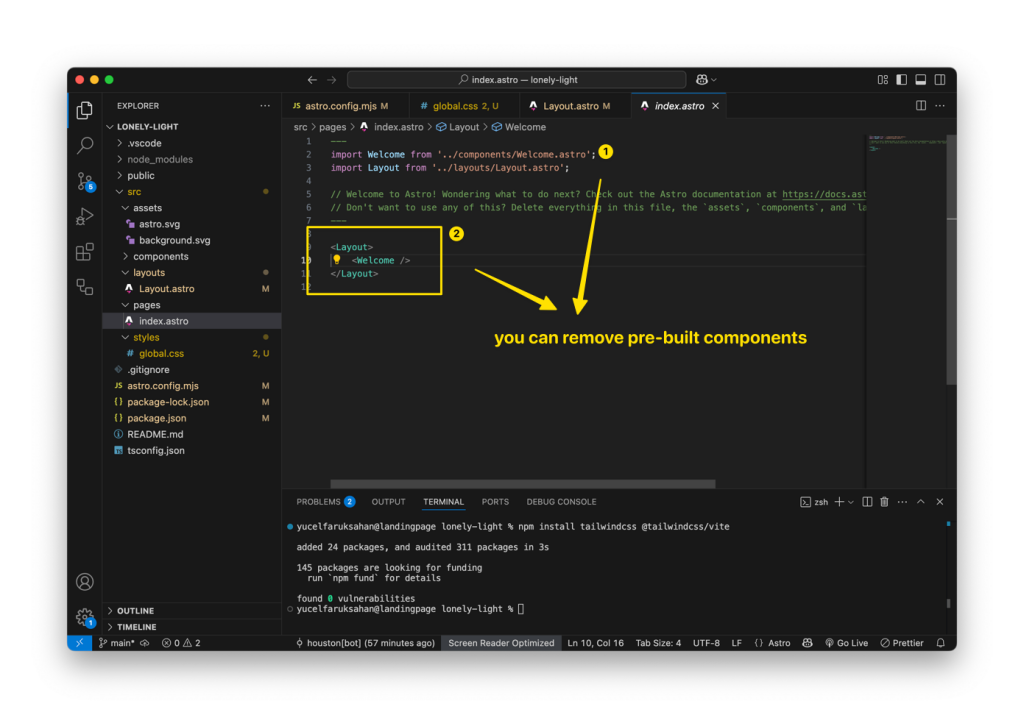 Why this works: pages live under
 src/pages/ and become routes, and layouts provide a reusable shell with a <slot /> for page content.
5) Preview your changes (dev & production)
Start the dev server (with live reload/HMR):
# npm
npm run dev

# pnpm / yarn
pnpm dev
yarn dev
Astro’s dev server runs at http://localhost:4321 by default and uses Hot Module Replacement (HMR) to update the browser as you save files. Press o + Enter to open the site, q + Enter to quit.
View on your phone (same Wi-Fi):
npm run dev -- --host
# or pick a port:
npm run dev -- --port 5173
--host exposes a LAN address; --port changes the port. Use this only for local testing, not production.
What updates live?
Edits to .astro, JS/TS, and CSS files hot-reload in the browser. New files in src/pages/ immediately become routes thanks to file-based routing.
When to restart the server:
If you change astro.config.mjs (e.g., add a plugin) and don’t see the effect after a refresh, stop and rerun the dev server.
Preview the production build
Build, then preview the output that will ship:
npm run build
npm run preview
build writes your site to dist/. preview serves that build locally so you can test the production output before deploying.
Tip:
Ctrl + Cstops either the dev server or the preview server. If a port is busy, rerun with--portto choose another one.
Quick cheat-sheet
Dev (HMR):
npm run dev→ edit files → browser updates instantly.Open quickly: press o + Enter in the dev terminal.
Expose on LAN:
npm run dev -- --host.Prod check:
npm run build && npm run preview.
If you want, I can weave this into the full article and renumber the sections so everything flows.
5) Add beautiful Markdown styles (optional)
The Typography plugin gives you polished defaults for long-form content like blog posts by adding prose classes.
1) Install and enable the plugin
npm i -D @tailwindcss/typography/* src/styles/global.css */
@import "tailwindcss";
@plugin "@tailwindcss/typography"; /* enables `prose` utilities */You can skip these steps, if its already done
Tailwind v4 loads plugins directly from CSS via the @plugin directive.
If you forget to install the package, you’ll see “Can’t resolve '@tailwindcss/typography'” when you run
npm run dev. Install it and restart the dev server.
2 — Create a Markdown layout
Make a layout that wraps content in an article.prose container.
Create: src/layouts/MarkdownLayout.astro
---
import Layout from "./Layout.astro"; // your base site shell
const { frontmatter } = Astro.props; // title, description, etc.
---
<Layout title={frontmatter.title}>
  <article class="prose prose-slate mx-auto max-w-2xl p-6 dark:prose-invert">
    <slot /> <!-- rendered Markdown goes here -->
  </article>
</Layout>
Astro Markdown pages can specify a layout in frontmatter; that component becomes the page wrapper. Remember to include <meta charset="utf-8"> in your base layout (Astro stops injecting it when you use a Markdown layout).
3 — Decide where posts live
For beginners, keep it simple and use file-based routing: every file in src/pages/ becomes a route. We’ll put posts under src/pages/blog/.
Create the folder:
src/pages/blog/Use kebab-case filenames (letters, numbers, hyphens). Example:
hello-astro-tailwind.md→ route/blog/hello-astro-tailwind/.
Tip: Later, you can migrate to Content Collections (
src/content/) for typed frontmatter and lists of posts. For now,src/pages/blog/is perfect.
4 — Create your first Markdown post
Create: src/pages/blog/hello-astro-tailwind.md
---
title: "Hello, Astro + Tailwind"
description: "Testing the Typography plugin with a simple post."
layout: "../../layouts/MarkdownLayout.astro"
date: 2025-08-12
draft: false
---

# Hello, Markdown

This is a paragraph with **bold text**, _italics_, and a link to [Astro](https://astro.build).

## Code block

```js
console.log("it just works!");
Lists
Headings
Blockquotes
All get clean defaults from the prose classes.
The `layout` frontmatter property points to the layout component that should wrap this page. :contentReference[oaicite:7]{index=7}
## Step 5 — Add images the easy way
Put fixed assets (like post images) in the **`public/`** folder and reference them with an absolute path in Markdown:
- Create: `public/blog/hello-astro-tailwind/cover.jpg`
- Use it in your post:
```md
Assets in public/ are served as-is and are ideal when you just want a stable URL in Markdown.
Need image optimization later? Astro also has an Images guide and components; start simple with
public/and upgrade when you’re ready.
6 — Preview it
Start the dev server and open the route your file created:
npm run dev
# visit http://localhost:4321/blog/hello-astro-tailwind/
Astro maps files under src/pages/ directly to URLs; saving your post hot-reloads the page.
What readers should remember
Folders & filenames:
src/pages/blog/your-post.md→/blog/your-post/. Keep names lowercase, kebab-case.Frontmatter: set
layoutto your Markdown layout and includetitle,description, anddate.Styling: enable Typography with
@plugin "@tailwindcss/typography";and wrap content inarticle.prose ….Images: drop them under
public/and reference with absolute paths in Markdown.
What’s next?
Add a components folder and start composing UI with utility classes.
Introduce a design system in
@themefor colors, spacing, and breakpoints
Astro added first-class support for Tailwind v4 in the 5.2 release cycle, and Tailwind’s official guide now shows the Vite plugin path for Astro with @import "tailwindcss" in a global stylesheet. This is the simplest and most future-friendly setup today.
FAQ
Should I use @astrojs/tailwind or the Vite plugin?
Use the @tailwindcss/vite plugin in vite.plugins; the old @astrojs/tailwind integration is deprecated for Tailwind v4. Astro’s 5.2 notes and the integration page both confirm this.
Where do I import Tailwind so it applies site-wide?
Create src/styles/global.css with @import "tailwindcss" and then import that file once in a page or layout (e.g., import "../styles/global.css" in your layout). This is the official setup shown in Tailwind’s Astro guide.
How do I add Markdown posts and control their URLs?
Put Markdown files under src/pages/blog/ (kebab-case names), and they become routes like /blog/my-post/ via Astro’s file-based routing. If you want a wrapper with prose styles, set a Markdown layout in the page’s frontmatter.
How do I preview my site locally and test the production build?
Run npm run dev to start the dev server (defaults to http://localhost:4321), then npm run build and npm run preview to serve the production build locally.

Yucel is a digital product creator and content writer with a knack for full-stack development. He loves blending technical know-how with engaging storytelling to build practical, user-friendly solutions. When he's not coding or writing, you'll likely find him exploring new tech trends or getting inspired by nature.
